
https://www.instagram.com/p/BJiwmbABdxa/
Author: Steph Louka
Stephanie is an EMS Physician and Life-Member of the Virginia Beach Volunteer Rescue Squad. She lives in Richmond, VA with her husband Amir.


I had a patient last week brought into the Pediatric ED for an allergic reaction. The child had known allergies, and by the EMR, had been prescribed an EpiPen by the Pediatrician – but mom said she didn’t have one at home to use. “We have insurance, but when I tried to fill the prescription, they wanted $620! I just can’t afford that,” she apologetically told me. I sat there in disbelief, assuming she had crappy insurance.
Flash forward three days later when the news hits the mainstream media:
“EpiPen price hike has parents of kids with allergies scrambling”
“Why did Mylan hike EpiPen prices 400%? Because they could”
Prehospital Implications
AEMTs and Paramedics, better check that drug box twice for your 1:1000 epi vials because you’ll be using them more often for anaphylaxis as parents and patients increasingly forgo the EpiPen. With a $400-$650 price tag (with insurance), and a 1 year expiration date, can you blame them? I certainly don’t. So brush up on your local protocols, and stay vigilant. For a good review on anaphylaxis, check out this post.

Emergency Department (ED) Implications
As with prehospital providers, we too need to be ready with the IM epinephrine. It’s always been recommended after EpiPen administration for patients to come to the ED to be observed for 4-6 hours in case they need a redose of epinephrine. As patients increasingly skip that first dose, we should expect more potential for respiratory distress and need for difficult airway management.
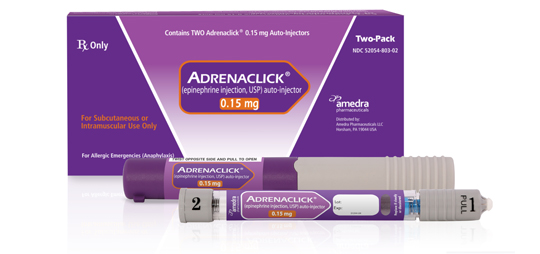
EpiPen Alternative
Thanks to the Facebook Group EM Docs, I learned of AdrenaClick, a reasonable alternative we can prescribe for patients with severe allergies. The mechanism of delivery is slightly different than the EpiPen (two caps to remove instead of one), but given that it’s 1/4 the cost – it’s what I’ll be prescribing moving forward. AdrenaClick has a good training video on their website with detailed instructions for use. With a coupon from GoodRx, AdrenaClick is available for as low as $141.67 at Wal-Mart. It’s still more than the original $57 cost of an EpiPen when acquired by Mylan, but better than current EpiPen prices.
If you want to learn more about the skyrocketing prices of the EpiPen and the not-so-coincidental tie to congressional mandates requiring EpiPens (like AEDs) in schools, check out this article on Bloomberg.
<Disclaimer> And, of course, I do not endorse the efficacy of, nor am I paid by AdrenaClick. They just happen to be the only other comparable epi auto-injector on the market right now. <Disclaimer />
~Steph
Share this:


If you work in the medical field, you’ve likely had to present a patient case report. You do a chart review, gather the physical exam and lab data, but often importing the CT scans, ultrasounds, MRIs and other video imaging for display in your PowerPoint can be a time-consuming and frustrating task.
I recently discovered an easy way to include multimedia medical images into PowerPoint in a fairly easy way. This process works on a Mac. For PCs, I’ve been told Pacstacker is the best available option for importing radiology imaging into PowerPoint.
You’ll need access to 3 things to get started. Make sure you have each of these available on the same Mac:
- The radiology image you want to capture, with the ability to scroll through
- QuickTime for Mac
- PowerPoint for Mac or PC
QuickTime includes a feature similar to the “Print Screen” feature. Instead of capturing just one image that instant, it captures your desktop activity in a selected area over time. The result is a video file you can import into PowerPoint or other presentation software.
Step 1: Open up your Radiology imaging viewer and select the scan you wish to include.
Step 2: Open QuickTime. From the File menu, select “New Screen Recording.”

Step 3: When the “Screen Recording” box pops up, click the red circular button to begin.

Step 4: A tan box will appear, asking you either click once to record the full screen, or drag and select with your mouse the portion of your screen you want included in your screen capture. For capturing radiology images, you’ll want to make sure you include only the image and exclude any personal identifiers to be HIPAA compliant.

Step 5: While recording, scroll through your imaging study making sure to include everything you want to display. I recommend scrolling through by clicking the arrows on the keyboard rather than using the mouse, as the cursor may accidentally enter the image field and therefore appear in your presentation.
Step 6: Click the “Stop” button to stop recording your screen capture. The button is somewhat hidden in the bar at the top of the screen. It’s the circular icon with the square in the middle that you see in the image below (right side of the screen, leftmost).

Step 7: After you click “Stop,” you’ll be prompted to save your video to your computer. Remember the location; you’ll need to find it later when you import your video into PowerPoint.
Step 8: Open your PowerPoint presentation. To import your imaging study, Go to Insert>Movie>Movie from File. Then find your file and click OK.

Step 9: Your imaging study is now imported into PowerPoint as a video. You can scroll backward and forward as needed during your presentation. To preview your video, start your presentation and click the triangular “Play” button on the bottom left. Note: if you click anywhere else on the slide, it will advance to your next slide, not start your video.
PowerPoint has improved over the years, and videos are now automatically embedded with your presentation when you save your .PPTx file. You may need to save your presentation file to DropBox, Google Drive or another cloud storage app as the file size is usually too large to send via email.
So that’s it – a previously arduous task made surprisingly simple. I hope this saves you some stress and time.
~Steph
Share this:


In our lives, “tubing” has two distinct meanings… this and this:
")

Prior to moving to Richmond, I’d been river tubing just once. It involved finding a rental company, making reservations, and forking over a lot of cash. So, when I came to Richmond and learned people tube on their own, I was intrigued. Turns out, it’s not as difficult as you might think. Just use this simple guide to help plan your tubing adventure.
Buy yourself some tubes
While there are tons of options out there, we’ve had good luck with the Intex brand available on Amazon.com. You don’t have to spend a lot of money to get something fun and reliable. There are many options, including single, double and cooler tubs, or our new favorite, tubes that connect.

Double Tube

Cooler Tube

Connecting Tube
The other piece of equipment you should seriously consider is a life jacket. Depending where you decide to tube and the level of the river, life jackets may be required. There are some great alternatives to the huge orange foam things from the 70s and 80s.

Old Life Jacket

Today’s Life Jacket
Also, if you don’t have tubes that connect, you’ll want to bring along a sturdy rope so you can tie your team together to float as a group.
Plan the Route
The route we enjoy most runs from Pony Pasture to Reedy Creek and is a 3 to 4 hour float that takes you down 2.5 miles of beautiful James River scenery. Float time will vary with the water level, so be sure to check it and plan accordingly.

You’ll need at least two cars to execute the required drop-off and drive back. First, plug Reedy Creek (4190 Riverside Dr, Richmond, VA 23225) into your GPS. Have both cars meet there. Pile all of your tubes (deflated), coolers and friends into one car and lock the other one up safely. It will stay behind at Reedy Creek.
Next, enter Pony Pasture (7200 Riverside Dr, Richmond, VA 23225) into your GPS. When you get there, you can pull up to unload all your stuff and blow up your tubes, but you may have to parallel park in the neighborhood as the lot is often full. Don’t forget to lock your car!
Launch!


A few important tips:
- Stay to the right – the rapids tend to be on the left in the James.
- Butts up! – lift your bottom up when going over rapids to help ensure you don’t get stuck.
- Be careful when walking on the bottom. There are major, abrupt drop offs as there are rocks lining the bottom.
- I REPEAT: The rapids past Reedy Creek are intense, dangerous and not fit for amateurs in innertubes. Don’t do it, or you may end up a Trauma patient in the ED with us!

Don’t Miss the Take Out
After floating underneath the train bridge in the photo above, you should start keeping a lookout for the Reedy Creek Take Out. The James will fork temporarily, and it’s important you stay to the right if you want to end up anywhere near your car. There’s a sign you can’t miss that says “TAKE OUT” with a big arrow guiding you to the right. Don’t go left. Even an UberXL won’t be large enough to fit your whole crew plus all your gear if you miss it.
When you exit the water and walk up, you’ll see the Reedy Creek parking lot where you left your other car. Time to deflate the tubes and pile everyone in this car to head back to Pony Pasture and grab the other car.
Capture the Fun
If you don’t have a waterproof camera or a GoPro, you can easily take pictures or videos with your SmartPhone with the help of a $10 Joto Waterproof phone case.

So that’s it. Grab your tubes, +/- a life jacket, cooler and some friends, and get ready for an awesome afternoon on your schedule.
~Steph

Share this:


This recipe is a staple at nearly every event my mom and I host. It’s easy to make, requiring no actual cooking. It’s always a hit, palatable to both adults and kids.
Serves: 10-20 party guests
Prep time: 15 minutes | Cook time: 0 minutes | Total time: 15 minutes
Ingredients:
- 2 cans of Frito-Lay Bean Dip
- 16 oz. sour cream
- 1 packet Old El Paso Taco Seasoning (Original)
- 8 oz. Mexican (four cheese) blend finely shredded cheese
- 12 oz pre-made guacamole (or make your own)
- 1/2 head of lettuce, diced
- 4 roma tomatoes, diced
- 1/2 cup chopped scallions (green onion)
- 1 bag Tostitos Scoops
Preparation:
 In a medium bowl, stir the taco seasoning into the sour cream.
- Prepare the produce by dicing the tomatoes, lettuce and scallions. Keep separated.
- In an ungreased 9″x13″ pan (for convenience use disposable), spread the 2 cans of bean dip along the bottom of the pan.
- Spread the guacamole evenly on top of the bean dip, using a spoon to level the surface.
- Spread the sour cream mix over the guacamole.
- Sprinkle the lettuce across the bean, guacamole and sour cream layers.
- Add an even layer of cheese (this should cover the lettuce completely)
- Add the roma tomatoes
- Finish with scallions (and black olives if desired)
Don’t forget the tortilla chips!
~Steph

