Pricey invitations got you down? Like most people, the hardest part of planning our wedding was making the most out of the budget we had. I had received some great advice to make a list of the Top 3 elements you care most about, and the 3 you care least about. That way you can shift money away from low priority items and towards what you really want.
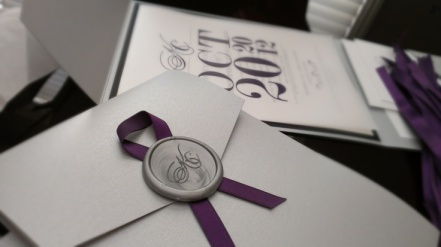
Dead last on our list was wedding cake, but just ahead of that were the invitations. We wanted something cheap that didn’t look cheap. Solution: Take a simple but elegant invite and fancy it up with specialty paper, silver leaf or other accents.

1. Pick a classic canvas
Simple is great and can give you a quality canvas for the base of your invite. Target, Michael’s and other online retailers sell great print-your-own invitation sets that you can format to your home printer specs. I really like the Gartner Studios collection at Target. The plain invites also have the benefit of being cheaper, and there’s typically more quantity in stock.
2. Find accents to match your colors
You can buy fine papers in any pattern you can think of online or at art & craft stores. Think about the tone you want to set for your big event – you invites will set the stage. Don’t be afraid to go bold. The other benefit of a simple, classy canvas is room to really show your creative side.
PaperSource.com has some great options, or check out Rossi1931.com for a breathtaking collection of fine Italian papers guaranteed to impress.
3. Accessorize you invites
Adding a 3D element to your invites can really raise them to a new level. Whether it’s a satin bow, wax seal, or a chrome paper clip, it’s the details that really make it your unique creation.
Just Google “invitation accessories” and get ready to explore endless possibilities. If you have good self control, consider breaking out your Bedazzler! Also, don’t be afraid to decorate your envelopes. Just make sure you check with the USPS regarding any increased costs or anticipated damage to your masterpiece. Depending on the postage option you choose, invites may be hand or machine sorted, so it pays to ask.

4. Find that one thing to tie it all together
Your wedding correspondence is a great way to set the stage for your event. Nothing says it has to be matchy-matchy, but before you get to work on production, try to identify at least one element to tie together your Save-the-Dates, Rehearsal Dinner Invites and Wedding Invites. It could be as simple as using the same font, or repeating a central color throughout. In our case we repeated our colors, and changed the design big time from event to event.


5. Time to produce your masterpiece
I highly recommend recruiting friends & family to help with this step. Create an assembly-line structure to ensure uniformity in each step and to keep things swift and fun. Having multiple bottles of Prosecco on hand does’t hurt either.

Please feel free to comment with any questions or ideas that you’ve tried! Special thanks to my mother, Kaye Krebs, and mother-in-law, Julia Louka, for creating all 240 of our invitations by hand.
~Steph


We had fun doing it too! Mother of the bride.
LikeLike